Easy Rice Krispie Treat Pumpkins Recipe
Rice Krispie Treat Pumpkins are the quintessential autumnal delight, bringing smiles and sticky fingers to kitchens everywhere. As the leaves turn vibrant shades of orange and red, and the air gets crisp, there’s a primal urge to embrace all things cozy and festive. And what’s more festive, and frankly, more fun to make, than these adorable little edible pumpkins? We absolutely adore Rice Krispie Treat Pumpkins because they tap into our nostalgic childhood memories. They’re incredibly simple to whip up, making them a perfect activity for little hands (and big kids too!). What truly makes these Rice Krispie Treat Pumpkins special is their adaptability. Beyond just their festive shape, you can customize them with different colors, add sprinkles, or even a touch of cinnamon for an extra fall flavor. Get ready to carve out some serious fun in the kitchen with this unbelievably easy and utterly charming recipe!

Rice Krispie Treat Pumpkins
Get ready for some spooky, sweet fun with these adorable Rice Krispie Treat Pumpkins! Perfect for Halloween parties, classroom treats, or just a delightful afternoon activity with the kids, these little gourds are surprisingly easy to make and guaranteed to bring smiles. We’re transforming the classic, beloved Rice Krispie treat into festive pumpkin shapes, complete with a stem and a hint of autumnal color. Forget complicated baking; this recipe is all about simple assembly and a touch of creative flair. Let’s dive into what you’ll need and how to conjure up these cheerful confections.
Ingredients:
- 1/4 cup Butter
- 1 bag large marshmallows (approximately 40 marshmallows)
- 6 cups Rice Krispies
- Red & Yellow Liquid Food Coloring
- Mini Rolos
- Green M&M’s
- 1/4 cup cooking oil or melted butter in a small bowl (to keep it from sticking to your hands)
Creating the Pumpkin Batter
The foundation of our pumpkin treats is the classic Rice Krispie treat mixture, but with a festive twist. We’ll be adding a warm, inviting orange hue to mimic the vibrant color of a real pumpkin.
1. **Melting the Marshmallows:** In a large, non-stick pot or a microwave-safe bowl, add the 1/4 cup of butter. If you’re using a pot, melt the butter over low heat, stirring occasionally until it’s completely liquid and no longer foamy. Be careful not to let it brown. If you’re using a microwave, heat the butter in 30-second intervals, stirring between each, until fully melted. Once the butter is melted, add the entire bag of large marshmallows. Continue to cook over low heat in the pot, stirring constantly, until the marshmallows are completely melted and smooth. If microwaving, heat the marshmallows in 30-second intervals, stirring well after each interval, until they are smooth and fully melted. This stirring is crucial to ensure an even melt and prevent scorching.
2. **Adding the Pumpkin Color:** This is where the magic happens! Once your marshmallows are perfectly melted and smooth, it’s time to introduce the color. You’ll want to create a beautiful, pumpkin-orange shade. Start by adding a few drops of yellow liquid food coloring and a drop or two of red liquid food coloring. Stir these in thoroughly until the color is evenly distributed throughout the marshmallow mixture. Don’t be afraid to experiment a little! You’re aiming for a rich, opaque orange. If it’s too pale, add another drop of yellow or red, stirring well after each addition. Remember, the Rice Krispies will lighten the color slightly once they are mixed in, so aim for a slightly deeper shade than you might think you need.
3. **Incorporating the Rice Krispies:** With the colorful, melted marshmallow mixture ready, it’s time to add the star ingredient: Rice Krispies cereal. Gradually add the 6 cups of Rice Krispies to the pot with the marshmallow mixture. Use a sturdy spatula or spoon to gently fold and stir the cereal into the marshmallow goo. Continue mixing until all the cereal is evenly coated. This step requires a bit of elbow grease, so ensure your spatula is strong! The goal is to get every single crispy rice puff coated in the sticky, orange marshmallow mixture. Work relatively quickly at this stage, as the mixture will start to set as it cools.
Shaping the Pumpkins
Now that we have our colorful, sticky mixture, it’s time to give it its iconic pumpkin shape. This is where a little bit of preparation makes all the difference.
4. **Forming the Pumpkin Shapes:** Before you begin shaping, make sure you have your small bowl of cooking oil or melted butter ready. Lightly grease your hands with the oil. This step is absolutely essential; otherwise, the sticky mixture will cling to your hands like glue! Take generous scoops of the Rice Krispie mixture and begin shaping them into round, pumpkin-like balls. You don’t need to be perfectly round; a slightly irregular shape will actually make them look more like real pumpkins. Aim for a size that’s easy to handle, perhaps about the size of a small tangerine. As you shape, gently pat and mold the mixture to ensure it holds its form.
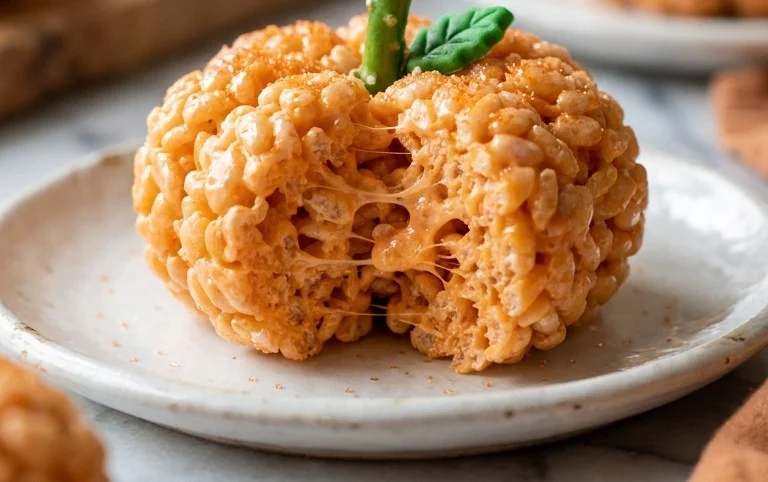
5. **Adding the Stems and Details:** Once you have a collection of pumpkin shapes, it’s time to add the finishing touches. For the stems, take a mini Rolo candy and gently press the wider end into the top center of each pumpkin shape. The Rolo’s shape is perfect for mimicking a pumpkin stem. To add a touch of leaf-like detail, take a green M&M and press it gently against the Rolo stem, or place it just above it. This adds a pop of green and a bit of visual interest. You can also use a toothpick or the edge of a knife to gently score some lines on the sides of your “pumpkins” to create a more textured, ribbed effect, further enhancing their resemblance to real pumpkins. If any of your pumpkins feel a bit wobbly, gently press the base to flatten it slightly so they can stand on their own.
Allow your adorable Rice Krispie Treat Pumpkins to cool completely at room temperature. This will allow them to firm up nicely and hold their shape. Once cooled, they are ready to be displayed and devoured! Enjoy your festive, homemade Halloween treats!
Conclusion:
I hope you had as much fun as I did creating these adorable and delicious Rice Krispie Treat Pumpkins! This recipe is a fantastic way to inject some festive autumn spirit into your kitchen, offering a simple yet incredibly rewarding baking experience. It’s perfect for little hands to help with, making it a wonderful family activity. The classic, chewy texture of Rice Krispie treats combined with the fun, pumpkin-shaped presentation is guaranteed to be a hit at any Halloween party, classroom gathering, or just for a delightful afternoon snack. Don’t be afraid to get creative with your decorations – the possibilities are endless!
For serving, these treats are wonderful on their own, but they also make a charming addition to a dessert table alongside other Halloween goodies. You can also package them individually as cute party favors. If you’re looking for variations, consider adding a touch of cinnamon or a dash of orange extract to the melted marshmallow mixture for an extra flavor boost. You could also experiment with different colors of candy melts or edible markers for more elaborate designs. So, go ahead and give these Rice Krispie Treat Pumpkins a try – I promise you won’t be disappointed!
Frequently Asked Questions:
Can I make these treats ahead of time?
Absolutely! Rice Krispie Treat Pumpkins can be made up to two days in advance and stored in an airtight container at room temperature. For longer storage, you can individually wrap them in plastic wrap and then store them in an airtight container.
How do I get the perfect pumpkin shape?
The key is to work quickly while the mixture is still warm and pliable. Lightly greasing your hands or a spatula with butter or cooking spray will prevent sticking. You can gently shape the warm mixture into a ball and then use your fingers or a butter knife to create the slight indentations for the pumpkin segments. Don’t worry about perfection; a slightly rustic look adds to their charm!
Are there any dairy-free options for this recipe?
Yes, you can easily make dairy-free Rice Krispie Treat Pumpkins! Use a dairy-free butter substitute and ensure your Rice Krispies cereal and any optional chocolate melts are also dairy-free.
Rice Krispie Treat Pumpkins
Spooky and sweet Rice Krispie treats shaped and decorated like miniature pumpkins, perfect for Halloween parties.
Ingredients
-
1/4 cup Butter
-
1 bag large marshmallows (approximately 40 marshmallows)
-
6 cups Rice Krispies
-
Red & Yellow Liquid Food Coloring
-
Mini Rolos
-
Green M&M’s
-
1/4 cup cooking oil or melted butter in a small bowl (to keep it from sticking to your hands)
Instructions
-
Step 1
Melt butter in a large saucepan over low heat. Add marshmallows and stir until completely melted. -
Step 2
Remove from heat. Add red and yellow food coloring, a few drops at a time, stirring until you achieve a pumpkin orange color. -
Step 3
Add Rice Krispies cereal to the marshmallow mixture and stir until well coated. -
Step 4
Grease your hands with cooking oil or melted butter. Shape the mixture into small pumpkin-like balls. Work quickly as the mixture will start to set. -
Step 5
Press a Mini Rolo into the top center of each pumpkin to create a stem. You may need to slightly mold the Rice Krispie mixture around it. -
Step 6
Use a Green M&M to decorate the top of the Rolo stem, resembling a leaf or vine. Let the treats cool completely before serving.
Important Information
Nutrition Facts (Per Serving)
It is important to consider this information as approximate and not to use it as definitive health advice.
Allergy Information
Please check ingredients for potential allergens and consult a health professional if in doubt.


